|
|
|
 |
||||||||||||
|
Blade
Pro controls
|
||||||||||||
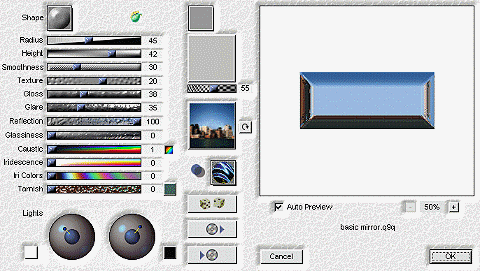
| For those new to the Blade Pro plugin, this page will run through the controls and show you what is editable. There is a lot that can be edited and may not be immediately apparent as we will see. As it is a bit wordy you might want to print it out. | ||||||||||||
 |
||||||||||||
|
Firstly, there are 3 ways to generate an effect to your image. The first is to select one already made as a preset, secondly use the random button and finally do one yourself. Let's look at the first method. If
you click on the button The
second method of random choice is carried out by clicking on the twin dice
button The
last choice is to design your own preset. You can start with selecting an
existing one as described above or you can start altering the sliders etc
to generate you own. Once you are happy with your masterpiece and want to
keep it. You click on the lower of the three buttons Let's have a look at what the controls do. In PI display the letter 'A' in cyan(that's the colour of this type) in font size of 128, bold and 2D. Now call up up BladePro from the effects menu. Select 'acid edge' as a starter. Click and hold down the mouse on the shape button. You will see a vertical row of assorted button formats. Move the mouse to the top one and release the button to select it. Now we will start at the top slider - 'Radius'. Move it to the left and right releasing the mouse button each time and you may see the image in the view window change. Changes between 1 and 10 will be most noticeable, leave it at 8. Do the same with 'Height' and set it at 31. The center is 0 so left is a negative number and right of center is positive. The next one down is roughly the smoothness of the bevel, set this to 50. Don't forget to play with each slider as we come to them and note carefully what the changes are. 'Texture' will give indentations to the left of center and bumps to the right. Now this has no affect yet as we do not have an image loaded in. Do this by placing the mouse over the empty window.(This is not the small box but the one below it). Click the mouse and a directory will pop up showing you files of images you can select. Choose 'crackle'. Now move the slider 'Texture' again and you will see it now has some effect. Set it to about 70. The chequered slider under the box is the magnification of the image applied. Try it now and see the effect. Now set this to about 75. The next sliders down affect the glare, gloss, reflections etc. Play with them and see what they do. Sometimes you will find they have little affect. This is determined by other settings etc. Alongside the slider 'Caustic) is a small button which can be toggled black/white to colour. The 'Iridescence' slider works in conjunction with 'Irid colours'. 'Tarnish' has a colour button which can be selected to give different colours of tarnish on the image. The third box down which as you can see has a coloured picture in it can also be changed. Left click produces a directory of images which can be selected. The little box to the right enables you to rotate the image for further affects. The coloured square below this can be selected by clicking and holding down the mouse button. This will display a vertical line of boxes. These affect the image in various ways. Try each one in turn. Then return to the top one called 'normal' which is the default. This is similar to merge in object properties in PI. The two controls marked 'lights' allow cloured lighting to be altered. Try moving the balls at the end of each bar coming from the senter of each one. It can pulled out and rotated around the disc. The colour can also be changed by clicking on the appropriate colour box each side of the discs. When working with large images, not all of the image is displayed in the view window. But if you move the mouse over the view window, the pointer changes to a hand which by clicking and holding down will allow you to push the image around inside the window. When you have experimented and want to apply the effect to you image, just click the 'OK' button and you will returned to PI. 'Cancel' obviously ignores any effects and returns you to PI with no changes applied. Finally, when you want to send a preset that you have made to somebody else, it is very important that you include the images that you used in Blade Pro, ie the .bmp's. If the images came with Blade Pro then there is no need, as everybody else will have it. Well, I think I have covered everything. It's up to you now. Just experiment with the sliders and you will soon get used to what does what. Remember to let us see your presets on the PhotoImpact Bulletin Board. |
||||||||||||
|
|
||||||||||||